
A Facebook friend, Mabel Marble, shared a link to Fred's tutorial for tying a single strand star knot. There's also a tutorial on the KHWW.net site for tying a single strand variant.
Feed the end strand back through the center of the star knot to make an adjustable sized loop lanyard...

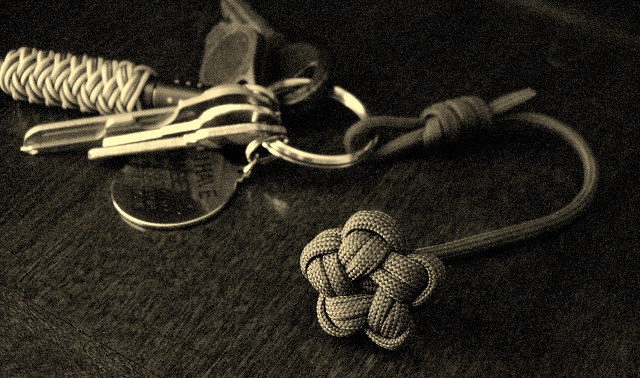
 Also shown as a fixed blade knife no-snag type lanyard where the loop can be closed up against the knife handle so that just a single strand hangs down and is less likely to get snagged on brush when walking through the woods than a loop would. You can use as a wrist loop or make the loop longer for using the lanyard across the back of the hand secure method. A few fixed blade lanyard use examples shown here, here, and another here.
 I added a bit of a description to what's being shown in the photos of Fred's single strand star knot tutorial, found below in the 'Comments' of this blog post.
Another Facebook member mentioned this method for tying the star knot was shown in Stuart E. Grainger's book, 'Turkshead Alternatives', currently out of print.
I uploaded a YouTube video on tying the single strand star knot, so between it and Fred's photo tutorial, hopefully the knot tying process is understandable...
Also see 'The Ashley Book of Knots'(ABoK #1396) "The Star Knot Turk's Head".


24 comments:
I tried following the instructions in the "Fred's tutorial" link but was unsuccessful. Any hints on how to understand the pictures on that page? I really like the star knot and would like to duplicate it. Thanks!
@Orion Slayer, I started with a 3 foot length of paracord, held in front of me from left to right. From the right side of the cord, come back about 8 inches and duplicate the first two photos of Fred's tutorial with the right end as the working strand 'A'.
For the third photo of the tutorial you work with the left side of the strand as your working end, bringing 'B' from under and up through 'A' as a loop, so now the left side shows as 'C'.
The fourth photo shows the path of 'C' around 'A', up through 'B', under the right side strand and bottom loop going up, then back down through 'B'.
The last photo shows 'C' going back down and through itself to the left where it goes under and over the loop to the left of the lower loop and back to the right where you start following the knot to double it up.
You just have to pay close attention to the arrows drawn on the last photo, after you've duplicated the the movement of 'C'. You can use your keyboard's CTRL and +/- keys to make the page/photos larger if needed.
Oh now that is just too cool! Reminds me of a 4 leaf clover... 5 leaf clover? Whatever it is, it's awesome.
Thanks for the detailed instructions...they made the pictures make sense!
I've tried to follow this for 30 minutes- is there a step by step video we can follow.
That picture with arrows is confusing the crap outta me!
Help!
@Anonymous, As of yet, I've not seen a video for tying the single strand star knot...
I use the star knot more than any other knot I tie. I do a lot of small projects like the key fobs and zipper pulls so it is the most useful for that purpose. And it is a fairly simple finishing knot as well once you get the hang of it.
I have kept persistent trying to conquer this knot- but when C arrives in the picture- I can't wrap my head around it clearly from the picture. Similarly, the purple arrows all but make my head spin!
Would someone mind taking a phone video of themselves creating this beautiful design slowly? I hope im not the only one struggling with this one!
-C
ok so i followed freds guide and the front of the knot came out fine but the back of it was messed up and not symmetrical to the front. what could have happened? is it supposed to be like that?
@Anonymous, Both sides of the knot should look the same after tying it. It's easy to get the cords misaligned/crossed if you miss an under/over somewhere.
I try to keep one side of the knot facing up as I work the knot, where turning it over and around would have me making mistakes so I'd have to back up or just start over. ;)
Many thanks for making the video! I'm eager to try it again with the YouTube help and some 550!
-C
I noticed the last picture has 7 points. Did you just add two extra loops or is it the drummer boy grommet?
@Anonymous, I added a couple more loops to make the seven point star.
At the point where the left side of the strand comes into play in the tutorial, just repeat that step for additional loops/points on the star before joining the start/end of the star and doubling the knot. ;)
Nice. I'm going to do a seven point tonight. This is by far my favorite knot to tie. I had a tough time getting it right until I just tied it as a single pass, tightened it up and then chased the tail. Keep'em coming man. Great site.
Guys this knot is killing me... Stormdranes video is great but it's a little too fast for me to keep up with and it seems like the more I try to conquer this the further j get from the end result. Does anyone know where I can either find a slower video tutorial, or a detailed picture instruction? Please help me!
could you give some clarification on how to get the short starter end back through the center of the knot? your video doesn't make it very clear, though the rest of it was very useful. thanks!
@amy, I use hemostats to pull the short end into the center of the knot, then again out the side. I do this to make it more secure than just trimming/tucking it where it originally was.
The link to Fred's tutorial changed to:
http://pas-a-pas-de-creativknots.over-blog.com/13-categorie-12094963.html
@Mark, Thanks, I updated the post link. :)
I have tried for two days on getting the six point star single strand knot that was linked by you. The pictures are a bit vague. I really like your seven point star with the hollow middle. Could you please make a video on how to do a six point one of these?? Thanks!!
I really like the 7 point star knot but I am having alot of trouble with it any help would be appreciated
@Clayton, Adding additional points to a star knot is done by making more 'slip knots' before connecting back with the starting end of the knot. See the third pic of Fred's photo tutorial .
Note that with more than five points on a star knot, the center will be open, even after tightening up the knot. Hope that helps. ;)
I made a 15 point star knot but it looked like a star grommet
Stormdrane, your a knot god. Lol
I have learned nearly every knot I know thanks to you, learning more every day. I love learning something that's different, yet impresses others without the skill, almost like doing magic. Thanks for the years of gratification and entertainment.
Post a Comment