.JPG)
Some folks just want a slip-on type
paracord bracelet, without a side-release buckle, knot and loop, button, or bead type closure. This is just another way of tying them instead of following more traditional tying methods, like some found online,
here and
here.
I prefer a finished slip-on bracelet to be a tight fit over my hand so that it's not too big on the wrist. You may untie/retie yours a time or two to get the fit just right.
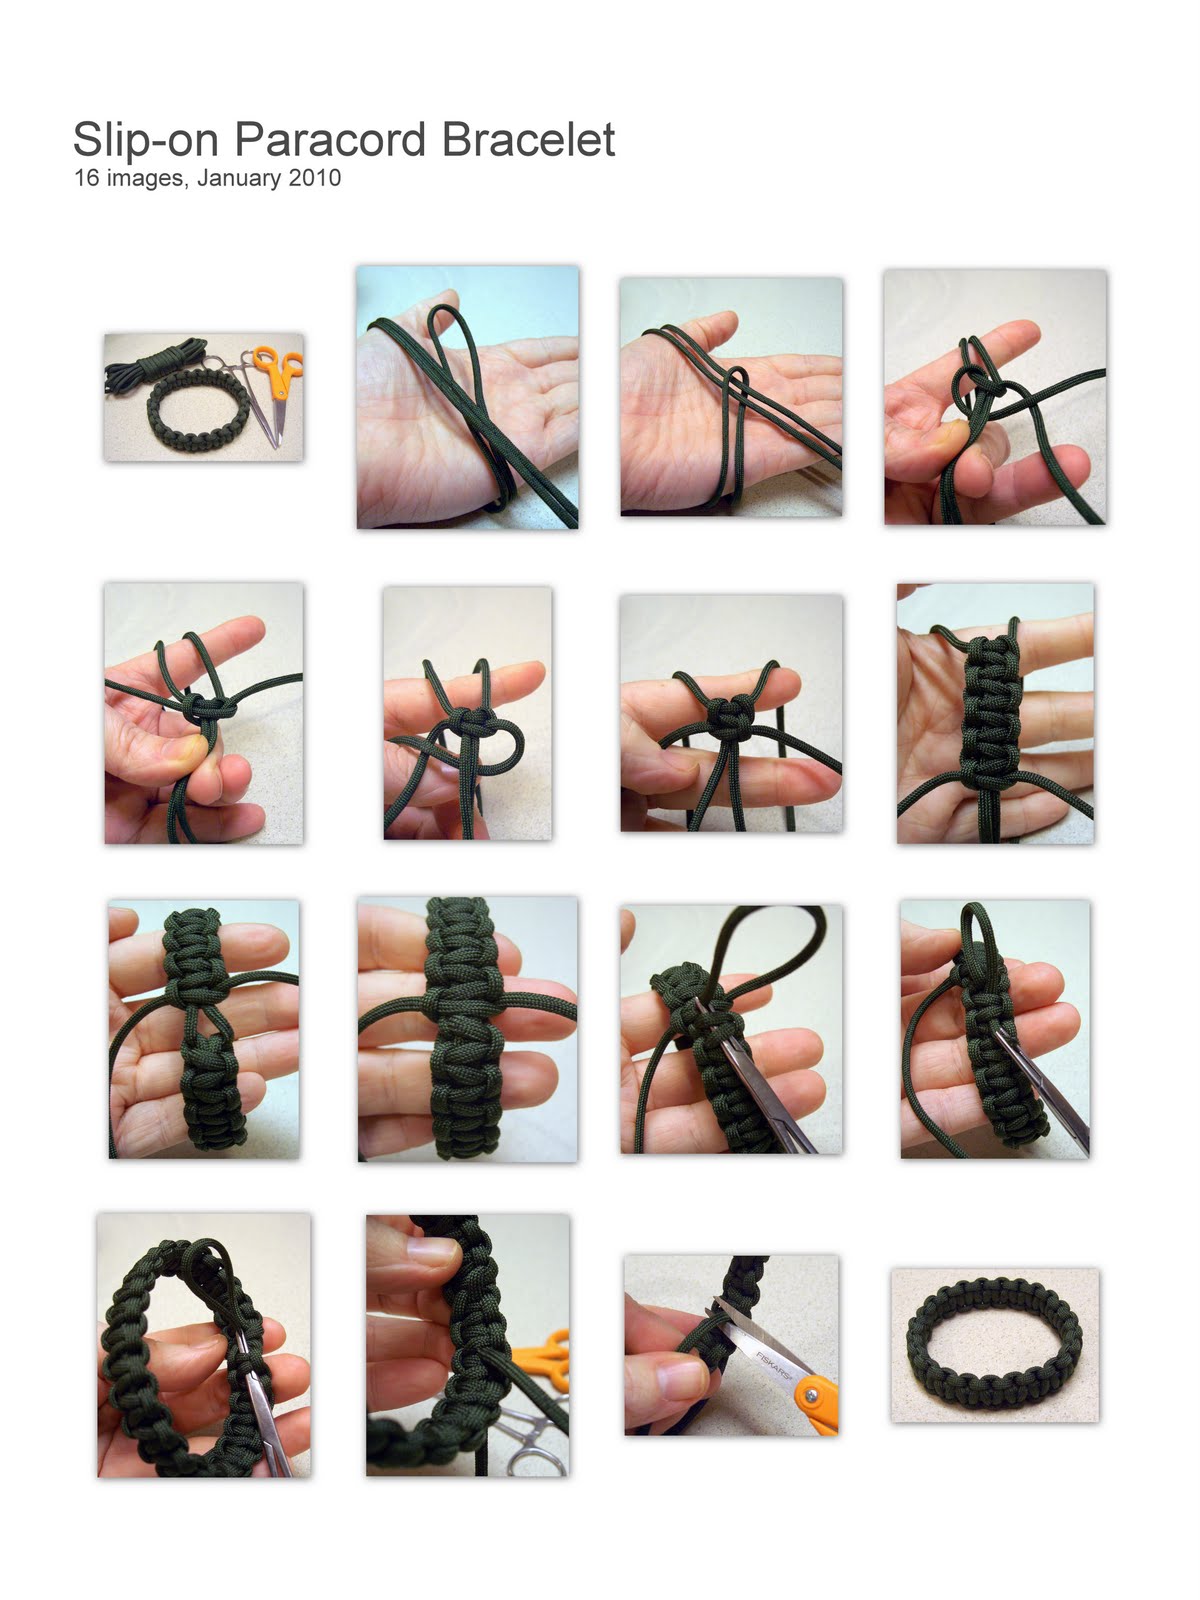
The photo collage should be easy enough to follow. Click on it to view a larger version.

Supplies I used, are 10.5 feet of paracord, hemostats, and scissors.
To start, find the center of the length of paracord and wrap it around the widest part of your hand. Run the working ends through the loop, making a 'lark's head', also called a 'cow hitch', or 'ring hitch'. Make sure to hold the cords at the fixed size around your hand, as you slide the paracord loop off your hand.
You'll start knotting around the two loop strands as the core. Continue knotting all the way around the core loop until you've filled the space back to where you started.
Use hemostats or thin needle nosed pliers to pull the remaining paracord ends under at least a couple of knots, one strand under the outer side and the other on the inner side of the bracelet. You can trim the excess off to finish, after working the cord under a couple of knots, or work it under more knots if you want to keep the extra remaining excess paracord strands. This can make the bracelet slightly thicker, so consider leaving a little more room when you first loop around your hand at the start.
.JPG)
The section where the start and finish meet may look slightly different depending on which side of the bracelet you have facing out.
You can of course use two colors of paracord by sewing, melting, or super gluing two strands together, with the connected section being in the loop part wrapped around your hand and knotted over. This will give you a 'reversible' paracord bracelet with different edge and center colors on each side.
.JPG)
You can also wrap the cord around your hand 2, 3, or more times at the start for a thicker core of 4, 6, or more strands to be knotted over, but this will also make for a thicker rounded bracelet and require a few extra feet of paracord for your starting length.
Other paracord bracelet variations(or hatbands) like the woven and half hitch types can also be tied this way. If you use double the amount of cord to start, you can do a king cobra/doubled Solomon bar/Portuguese sinnet version, after tying all the way around once and going over all the knots again. But, remember that the added thickness will require a little more slack around the wide part of your hand at the start, so that the finished bracelet won't be too tight to fit over your hand when sliding on the wrist.
.JPG)
As
Charlie mentioned in the comments of the previous blog post, elastic or shock cord can be used for the core of a seamless bracelet and knotted over, to allow it to stretch over a hand and still fit snugly around the wrist. I'd tried shock cord like that a few years ago, for an adjustable fit slide on/off watchband, but couldn't get it to where it felt comfortable to me, but it may work fine for others.
*Added a video slide show tutorial for this project on
YouTube.
 JD of TyingItAllTogether recently put up a YouTube video of the tying process for the Slatt's Rescue Belt.
 I used just over 13 feet of paracord to make the bracelet version, using four loops to fill the space on the buckle ends. The start or finish strand can be untucked to quickly unravel the paracord if it is needed in a hurry.