Sunday, July 28, 2013

Shoelace lattice lacing a paracord bracelet, continued...

Like the previous blog post on shoelacing and paracord, applying techniques from Ian Fieggen's book, 'Laces', I added some lattice lacing to another already tied bracelet, doing the same 10 eyelet lacing pattern.  But, this time started at one side release buckle end, working toward the center,  tying two consecutive patterns.  Note this is all done with the same single strand, although you could used separate strands to alternate colors, or do different lacing patterns, etc.

Once two patterns were done, I ran the working ends of the lacing cord down alongside the core strands of the bracelet, keeping them out of sight, to the opposite buckle end, and then tied the remaining two patterns back towards the center, for a finished bracelet with four lattice laced patterns added in.  It just worked out by luck that the spacing between each pattern was the same.  A different sized  bracelet might require shorter lacing patterns to equal out the same way. 

I wasn't sure how much 0.9mm cord I would need to begin, so I over-guesstimated(hopefully at the time) with a 12 foot length, and small Perma-Lok lacing needles on each end of the strand.  Without the lacing needles, it would be a chore to work the cord through with hemostats, but still doable.  I ended up needing just 6 feet of the 0.9mm cord after tying, securing, tucking, and trimming the excess off.

Because the tightened lacing can stiffen up the bracelet sections where it's tied, I worked the lacing with the bracelet buckled together in a round shape, trying to make sure and maintain the curve of the bracelet.  If you don't do this, and add the lacing to a flat bracelet, you'll find that it doesn't want to curve to wrap around a wrist anymore, and cursing may ensue with untying/retying, if you still have any patience left, lol.

If you're adding the lacing to a paracord lanyard of fob, by all means work the lacing into a flat straightened section where the stiffness won't be a problem, and maybe patterns can be tied on both sides...
 

Monday, July 22, 2013

Shoe-lacing paracord bracelets...


I recently bought a copy of Ian "Professor Shoelace" Fieggen's book, 'Laces' from amazon.com, and applied one of the lacing variation patterns in his book to a paracord bracelet.

For the example I show here, I followed a 10 eyelet lattice lacing pattern, and used the spaces on each side of a basic Solomon bar/Portuguese sinnet/cobra stitch bracelet as improvised 'eyelets'I worked the orange 0.9mm cord, using a pair of small Perma-Lok lacing needles, to go over, under, and around an already tied olive drab paracord bracelet to make the design.
The book, and Ian's site, have a lot of patterns to explore, not just to "pimp your kicks", but to play around with other possibilities...
Ian's Shoelace Site has been in my blog's links list for a long time, and for many, tying shoelaces may have been their first introduction to knot work, so I've found the site to be worth a visit. ;)


Sunday, July 21, 2013

Groovin' with Spanish Ring Knots...

Tied a few Spanish ring knots in the grooves of my Trustfire Z1 and Olight S20 Baton LED flashlights.  I used 0.9mm sized cord for a couple in black on the Z1, and orange on the other.

Also added a short tan paracord fingerloop fob with an extended two-strand diamond knot(ABoK #782), and some west country whipping near the split ring attachment.

Also tied a navy blue paracord bracelet with some orange tether cord added in.  It looks like a Stitched Solomon Bar, but wasn't tied that way, instead tying a basic paracord bracelet, with a 3/8" flat side release buckle, then I went back and added the tether cord, using a Perma-Lok lacing needle to run the cord over/under the center strands first in one direction, then back in the other direction.

The start and end strands of the tether cord were tucked alongside the core strands of the bracelet. It's reversible with the flat buckle, one side showing the stitching, and the other side looks plain, like a basic Solomon bar/Portuguese sinnet/cobra stitch paracord bracelet.

The lights are resting on a paracord Carrick Mat, which servers as a drink coaster, and also a place for keys/lights/knives/multitools, so they don't scratch up a desktop/dresser/nightstand...
 

Friday, July 12, 2013

Paracord and a horseshoe nail cross pendant...


This horseshoe nail cross pendant has gutted paracord tied in two-strand wall knots around it, with a navy blue paracord neck cord and safety break-away buckle.

To start, I made the horseshoe nail pendant first, bending the nails with pliers and using the nail holes on a small anvil to help get better leverage with the bending.

A bit of krazy/super glue was used to hold the cross together before I tied an 'X' lashing around the center of the cross with 0.9mm black cord.  Not quite a square or diagonal lashing, but started with a constrictor knot, several wraps at one angle then the other for the 'X' around the center of the cross, and finishing with another constrictor knot.

Then I used two separate strands of gutted paracord, about 1.5 feet for the top and 2 feet for the bottom, tying two-strand wall knots around the nails.  After a couple of knots on the top section of the cross, I tied four more on the bottom section, then used strands from both to work the last couple of knots on each arm, trimmed and melting the ends in place with my wood burning tool.

For the neck cord, I used a 32 inch length of paracord, pulling about 1 inch of inner strands from each end, trimmed those, then pulled the outer sheath back over the core strands.  I worked the end of each strand around the safety break-away buckle and sewed the paracord back to itself with needle and polyester thread to secure the ends, instead of using a knot, but you could do whichever you find easier.

This is just another possible variaton of adding knot work to a horseshoe nail cross, and some folks will probably find this much easier to tie than jumping in with a Turk's head knot variation... ;)

And a photo added of the nails shown bent to shape before adding knot work.  I use a couple of different types of small pliers, needle nose and locking to bend the 2" long horseshoe nails, along with a small anvil to help with leverage in bending them.  I don't get technical with measuring, just eyeball it and maybe mark with a Sharpie where I want to bend each one.  You just figure out how tall/wide you want the cross to be according to your preference.

For someone that plans to make a lot of the crosses, a jig for bending, like the one used in this YouTube tutorial would probably come in handy.


Wednesday, July 03, 2013

Red, white & blue, and a single strand star...

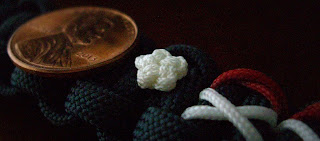
Was fiddling around with stitching in some red and white 1.4mm cord into a navy blue paracord bracelet, and added in a single strand star knot that I tied with 0.9mm cord.

I had planned on tying several of the small star knots to add in for a flag themed bracelet, but my hands and eyes didn't want to cooperate, so I stopped with one good knot after several attempts over the last few days

I tried about a half dozen different variations on the stitching, and I'm still not satisfied, so I'll likely untie and try some more later...

I hope everyone has a safe and happy 4th of July, Independence Day in the U.S.A.


Stormdrane x Mochibrand Drawstring Backpack Venom