 I tied both of these paracord bracelets with metal side-release buckles that I received from IGKT member, Martin Combs. Martin's website can be found at knotstuff.com.
I think the small metal buckles give the paracord bracelets a classy look, compared with the more common plastic versions.
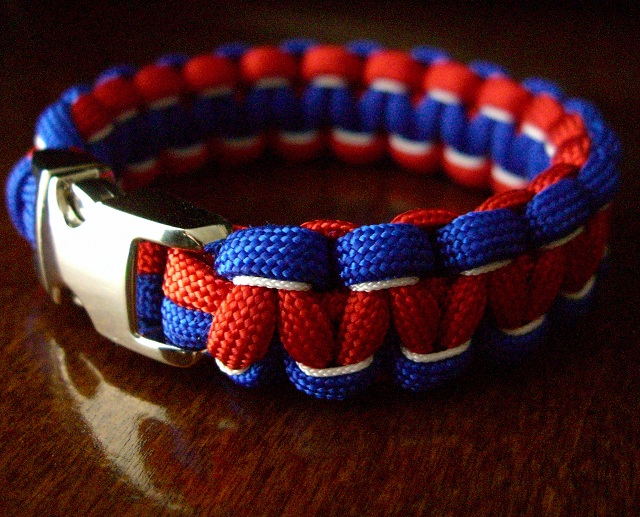
I used electric blue for the Shark Jaw Bone, and combined that color with bright red paracord for the classic Solomon Bar, both patterns found in JD Lenzen's(TIAT) book, 'Paracord Fusion Ties - Volume 1', shown tied with knot and loop closures.
 After tying the bracelets, I then went back and added the stitching on each with 0.9mm nylon cord. I used my small Perma-Lok lacing needle to work the stitching into the patterns. I tucked and trimmed all the end strands along the undersides of the finished bracelets. I bought the orange cord from R&W Rope, and the white off ebay.
With the Solomon Bar/Portuguese sinnet/cobra stitch bracelet, I worked the stitching all the way down one side then back up the other, so the white is visible on both sides. I started by running the white a couple of inches up the middle of the bracelet towards one buckle end, to secure it, and did that again after the stitching, from buckle end, down the center a couple of inches, trimming and tucking to finish.
Tying a bracelet with a knot/loop closure, bow/D shackle, or flat side-release buckle, can make it a reversible pattern. The metal buckle is flat on one side and curved on the other, but since it's small, there wasn't much of a noticeable difference in wearing it either way, so it's useable like that too.
With the Shark Jaw Bone pattern, I also ran the starting end a couple of inches towards a buckle. Following the toothy pattern develops a design which looks similar to previously tied center stitched bracelets.
A stairstepped pattern might also work on the SJB, done by working straight from one end to the other. On this one, the orange stitching is only visible on one side, so that only the blue paracord shows on the reverse. If you spend enough time playing around with stitching, you can add in patterns found in some knot books, or maybe come up with something new...

'Paracord Fusion Ties - Volume 2' is due out this summer.
15 comments:
Very nice buckles. Did the place you got them from offer a brushed version? (I'm assuming these are mirrored, from the picture)
@demuredemeanor, I think Martin just has the polished/mirrored buckles. I don't know if anyone makes thim with a brushed or stonewashed finish.
It might be possible to put them in a tumbler to change their look/texture, but I do not have one to try that out...
These look to be just run of the mill chrome plated buckles. Its easy to get the brushed look with these. I have done this on car parts that have the chrome plate.
Basically all you do is use scotch-brite pad and rub in one direction.
http://forums.vwvortex.com/showthread.php?2937700
This is a good visual of the results. It might be a bit tedious to do this with a buckle. But if you want the look this is about your only option.
Great looking addition to the bracelet-both the metal buckle and the accent that the thin cord adds. Are you going to do a tutorial on how you do this? I think I see how it's done in my minds eye, just want to be certain.
what size buckles do you use?
@Jeannie, The metal buckles that I got from Martin Combs and used in this blog post, are listed on his site as 3/8". Compared with plastic side release buckles, I'd say their sized inbetween 3/8" and 1/2" sized buckles.
I'm dying for something new! I check this website everyday. LOVE your stuff!
Hey man, just wanted to say thanks for what you do. I always had a passing interest in knots and in my mind would think "someday I'm going to do some research and really learn how to tie some stuff". Recently stumbled upon an Instructable by you and combed through all your blogs. Love em all. Thanks to you and JD, I have rekindled my passion. Now to get some books and learn how the hell to tie a Turk's Head and what all those numbers mean... Thanks!
@Simone, With many starts for paracord bracelet patterns, adding a buckle is looping onto one end, running the cords down to and around the other end, figuring for wrist size, then follow the knotting pattern to use the working ends around the core strands.
Finishing can usually be done by either melting, gluing, sewing, or tucking the end strands back under the knot work.
@Simone, For a two color Solomon bar, I just sew/melt/or glue two colors together, and then have one length of cord to work with, just like a single color version.
So instead of one 10 foot single color cord, I have two 5 foot lengths attached together.
Attach your connected strands to a buckle, with the connected section as the core strands to be knotted over/around. The joined section gets covered up by your knot work.
I usually just run needle/thread back and forth through the connected point several times, and that's worked well for me over the years. Others like to melt both ends and press together, or use a single drop of super glue and let dry before tying.
Finishing up the bracelet is the same options as the other, sew/melt/glue or tuck the end strands under a few knots with lacing needle or hemostats, just like the shark jaw bone example...
Looks great! :)
These are very nice looking Stormdrane, excellent choice of colors! Very elegant
Hello,
Found you on youtube and comments are disabled for some reason. Wanted to say, Wow". I've never followed a blog before and so cannot find on your page how to do so. Can you help me out? Thank you
@Audra, There's a 'Followers' widget down on the left sidebar of the blog, towards the bottom of the page, along with Twitter/Pinterest/Flickr/YouTube subscription links. ;)
Brushed black is available. I think the gunmetal is a good looking finish to use also. I made a couple with some woodland camo with hunter safety orange for the stitching. I used the gunmetal and brass finish buckles and gave them to some friends that work with the hunter safety program they really liked them and a few of the kids have started making them also and I'm seeing them on kids around town (and suprisingly a few adults).
Post a Comment