Showing posts sorted by relevance for query two-strand wall knot. Sort by date Show all posts

Tuesday, June 09, 2015

A two-strand wall sinnet paracord lanyard...

This video tutorial shows how to tie a two-strand wall knot sinnet paracord lanyard with a few beads provided by Schmuckatelli Co., featuring the new Sabertooth design.  Another example is shown with the new Spartan beads.  They can make nice wallet lanyards and also do well with retention of keychains, multitools, pocket knives, or other edc gadgets, gear, and gizmos.


I used 325 paracord which is slightly smaller in diameter than 550 paracord, and was easier to fit through the beads in the video demo.  I have pulled some ungutted 550 paracord through the beads, but it was a very tight fit, where gutted paracord was easier to get through.

There is a short demo of tying the 'snake knot' after the two-strand wall knot sinnet lanyard is finished.  Some folks call both a 'snake knot', I just learned them differently. ;)
 The black and red color 'licorice' pattern is 425 paracord.


The two-strand wall knot is knot #775 in 'The Ashley Book of Knots' (ABoK page 140).


A limited production piece of  Pro-Tech's Half Breed Auto knife with Schmuckatelli Co.'s skull logo image done in damascus steel and a cool mosaic pin for the open/unlock button.


The VENOM mochi by Stormdrane is currently showing as 'Sold Out', but Mochibrand still has many other models to choose from and there's currently a Kickstarter campaign for a new updated/upgraded version of their drawstring backpack underway. 


Tuesday, June 02, 2015

A paracord camera strap...

I finished this paracord camera strap this morning.  After every so many two strand wall knots being tightened, my hands/fingers would cramp up a bit, so this took a lot of start and stop tying in between other knotty projects that I'm currently working on.  

The strap ended up being 50 inches long stretched out; instead of the intended 48 inch length, and my guesstimate of 70 feet to start with left me with two ends to trim, one 6.5 inches long and the other strand 8 inches. I got lucky with that guess, why can't I pick good lottery numbers like that, lol...   With the exception of the gaucho knots, the method of making this strap is not much different than my instructable from 2007.

Moss green paracord camera strap of two-strand wall knots (doubled example diagram), without the extra turn of the 'snake' knot, and gaucho knots on each end. I ended up using over 68 feet of a single strand of cord. Two 12mm (around 1/2 inch) split rings are on each end for attachment purposes.

The one end is sitting kinda low in the wall knot, so I'll run a marlin spike under it to pop it back out a bit.

  
The nature of this knot tied around a couple of core strands lets the end user twist the strap one way to make it straightened along the length of the strap, or twisted in the opposite direction down the length for a more twisted look. It naturally wants to twist anyway, like a rope, but I think I personally prefer the more straightened out look...


And shown attached to my binoculars for now, since I don't have a DSLR(maybe one day...) 

Another project that has been in the works is adding some spare paracord to a lightweight AR15 stock for a friend, with woodland camo and black cord.  Hopefully I'll have a good final wrap to hand over to Roger and hang out at the SwissBianco booth(#720) at the BladeShow on Friday.  If you have any interest in knives, the show is worth the trip. ;)

I finally tried knot tying friend Manuel Zambrano's, 'Manny's Method', for joining the two colors of cord.  I usually just tuck one strand in the other and sew them together, which has worked just fine for me for years, but I eventually get around to trying new things too, lol..  


So far I've tried a few simple common ties, including the cobra stitch/Solomon bar/Portuguese sinnet, king cobra/doubled Solomon bar, and the twisted Solomon.  

Those tested adding around six to twelve feet of cord that can be untied and re-purposed if needed, for simple thing like replacing a broken shoe/boot lace, a temporary fix to a broken backpack strap, a garrote for zombies when the rifle runs out of ammo, so forth and so on...  I'll probably try a Turk's head knot or variation as well to see how much cord that'll add, to look cool on the rifle and be useful too.


Here's a long two bight Turk's head knot( 13 lead/part 2 bight), tripled with two passes of woodland camo and one pass of black paracord between them.  I ran the excess camo cord back and forth under the knot before tightening, but ran into a problem with a few excess inches of cord leaving a short loop to hide underneath the now too tight knot, lol... Will untie and try again. ;) 


Another two bight Turk's head, this time with the black cord added in for the pineapple knot interweave.


And a coiled wrap version holding around 17+ feet of paracord, half woodland camo and half black.  This one is also probably the fastest to unravel if the cord is needed and won't leave a lot of kinks in the cord from previously being knotted up which includes quick release type/zipper sinnet knots, which might create weak points along the strand reducing its strength/durability, when compared to new cord that hasn't been exposed to water, sweat, salt, dirt and friction wear, if it does need to be reused.  The coil may also be more susceptible to being pulled out of sorts by branches or other pointy objects it might get caught on that the knotted versions may not be affected by...


Friday, July 12, 2013

Paracord and a horseshoe nail cross pendant...


This horseshoe nail cross pendant has gutted paracord tied in two-strand wall knots around it, with a navy blue paracord neck cord and safety break-away buckle.

To start, I made the horseshoe nail pendant first, bending the nails with pliers and using the nail holes on a small anvil to help get better leverage with the bending.

A bit of krazy/super glue was used to hold the cross together before I tied an 'X' lashing around the center of the cross with 0.9mm black cord.  Not quite a square or diagonal lashing, but started with a constrictor knot, several wraps at one angle then the other for the 'X' around the center of the cross, and finishing with another constrictor knot.

Then I used two separate strands of gutted paracord, about 1.5 feet for the top and 2 feet for the bottom, tying two-strand wall knots around the nails.  After a couple of knots on the top section of the cross, I tied four more on the bottom section, then used strands from both to work the last couple of knots on each arm, trimmed and melting the ends in place with my wood burning tool.

For the neck cord, I used a 32 inch length of paracord, pulling about 1 inch of inner strands from each end, trimmed those, then pulled the outer sheath back over the core strands.  I worked the end of each strand around the safety break-away buckle and sewed the paracord back to itself with needle and polyester thread to secure the ends, instead of using a knot, but you could do whichever you find easier.

This is just another possible variaton of adding knot work to a horseshoe nail cross, and some folks will probably find this much easier to tie than jumping in with a Turk's head knot variation... ;)

And a photo added of the nails shown bent to shape before adding knot work.  I use a couple of different types of small pliers, needle nose and locking to bend the 2" long horseshoe nails, along with a small anvil to help with leverage in bending them.  I don't get technical with measuring, just eyeball it and maybe mark with a Sharpie where I want to bend each one.  You just figure out how tall/wide you want the cross to be according to your preference.

For someone that plans to make a lot of the crosses, a jig for bending, like the one used in this YouTube tutorial would probably come in handy.


Monday, August 19, 2013

Titanium tent peg doing marlinspike duty...

I recently bought a couple of Vargo titanium tent pegs/stakes, with the intent to try using them as marlinspikes for knot work, and they've both worked out alright so far, without bending.  

Using some 1.4mm cord, I tied a pineapple knot on at the top of the Vargo Ultralight peg, slid on a pewter Kiko Tiki bead, and then tied a single pass long 4 bight Turk's head knot under the bead.

I'd already tied and tried several other knots on the stake/peg, using smaller 0.9mm cord for a Hansen knot, then a headhunter knot, and two-bight and four bight TH knots before finally stopping with the knots shown.  My fingers are cramped up and done for the day, and trying to stay focused on smaller work takes a toll on my eyes too, lol.

The other larger titanium tent stake/peg, shown with a trio of 5 lead 4 bight Turk's head knots - two single pass knots on either side of a doubled knot on a wooden bead, is about 5mm thick compared to the thinner 4mm Ultralight version, so the only beads I have that fit on it are wooden ones

I added a short paracord pull loop with an extended two-strand Matthew Walker knot, to hang it from a peg on a work bench, if I actually had a work bench.  I might try a globe knot around one of those beads, using some leftover 3/32" leather lace.

I also made a simple paracord neck/ID badge lanyard with a scrap length of electric blue cord I had leftover, using a Leatherman Carabiner for the attachment, with a cat's paw knot, a few two-strand wall knots, adding a 'Mind' skull bead, and finished with a safety break-away clasp.

I'm wondering if I can get some glow-in-the-dark epoxy mix into the eye sockets of the tiny little skulls on the larger one, something for later...

Sunday, April 13, 2014

Paracord & Day of the Dead Sugar Skulls..

Schmuckatelli Co. sent me a few samples of their newest, yet unnamed skull beads(now called Aquilo), along with a note, "The bead is based on "island" art sugar skulls that are also commonly seen in Day of the Dead celebrations and we will be releasing it very soon.". They have some nice detail work to them, and look good in both the pewter and the black oxide finishes.

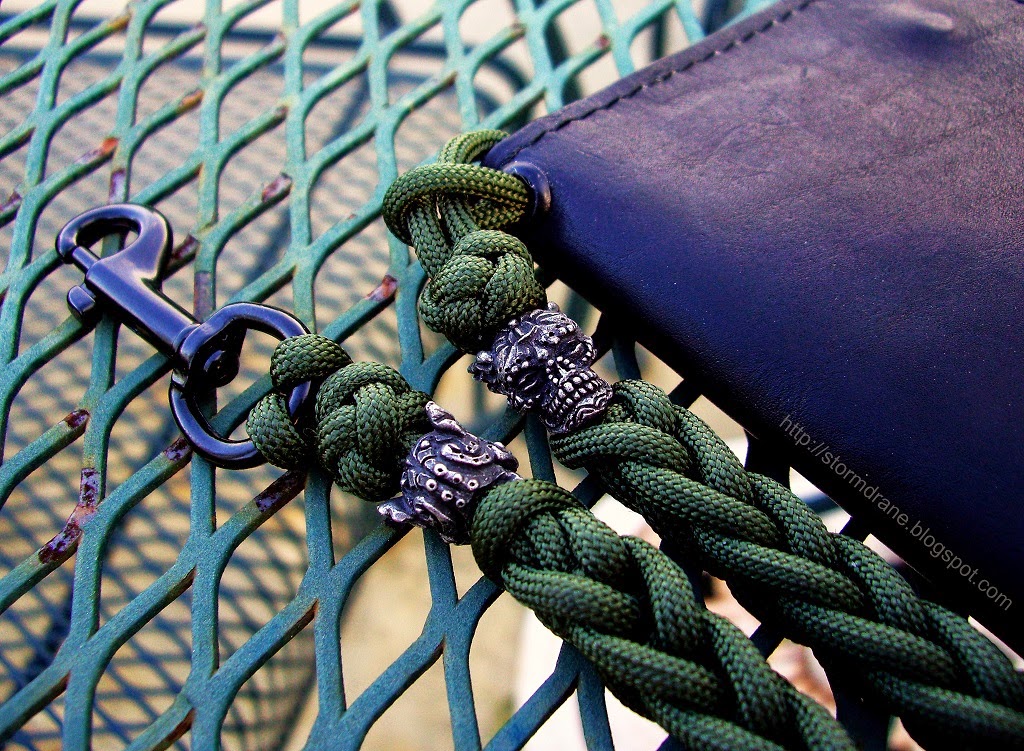
I was recently asked about doing some thick sized paracord wallet chains, and I suggested that they give spool knitting a try to create something like they were looking for.

I tied one using just two of the three nails/pegs for a square shaped lanyard, using camo green paracord that I had on hand, adding in the two black oxide skulls, one at each end, tying lanyard knot and loops at both ends, adding a black snap hook on one end, and leaving the other loop end for running a belt through it, or as shown attached to a biker/trucker wallet through the lanyard/chain hollow rivet.


I started with about 20 feet of paracord, and trimmed off a little over a foot of excess, and the finished wallet lanyard is about 30 inches long. I'm a big fella, so I like having the longer length to cover the real estate between my belt and pockets, you can certainly make them shorter or longer to fit your needs. ;)

I used the same spool I'd made with nails/PVC section(1.25" diameter)/epoxy/electrical tape, working the cord with a clay stylus, and shared an example photo of a three peg spool knitted neck lanyard to give folks an idea of how large that can actually get.

I also tied a couple of pocket knife lanyard/fobs with the pewter sugar skull beads, one with un-gutted black paracord shown attached to a Kershaw Nerve, and the other with gutted black and camo green paracord, with the added 1.4mm cord Gaucho knot, attached to my Spyderco Salt I.

The black lanyard was tied with a series of two-strand stopper knots(ABoK #778), each tightened and worked up close to the previous one.  The black/green one was tied starting with a square crown sinnet, added a wall knot, then did a bit of round crown sinnet, another wall knot, and more square crown knotting to finish.  I went back and added the Gaucho knot over the center round section.

I made a wrist lanyard with the last skull bead, using some zombie virus pattern paracord.  With camo and multi-colored versions of paracord, it can make it hard to see any decorative type pattern of the knots(, so I usually either combine it with solid colors, or just use a simpler knot like the extended Matthew Walker knot.  I took a few example photos of using it as a flashlight lanyard, a camera wrist strap, and EDC key chain lanyard.


And I've had some navy blue 1/16" Type I dummy/accessory cord that I'd bought over a year ago gathering dust, so I made a neck/ID badge lanyard using some of it, with one of the skull beads.

Here's the link to the Schmuckatelli Co. Facebook page.

Thursday, July 10, 2014

Encompassed in Brass

I received a couple of cool new items from County Comm last month.  The Brass Match/Compass Capsule and the Companion Compass.

I've tied/untied several ideas with both pieces, using paracord, gutted and un-gutted, tether cord, 1.4mm cord, and 0.9mm string, even zigzag spooling some.  They look nice just as they came, so I almost left them naked, just with a dummy cord attached, lol...

For the capsule, I went with 0.9mm cord to tie a Gaucho knot variation from a 3 lead 5 bight Turk's head, expanded to a 5 lead 9 bight, then worked in the Gaucho pattern.  Next was Moku hitching, then another Gaucho to finish.

I stared with a 10 foot long strand of the 0.9mm cord, tying and tightening the first knot, then added in another 10 foot strand to do the Moku hitching with both strands, and finished with the other Gaucho knot with the remainder of the second strand.

I got lucky with the cord I'd need guesstimate, and ended up just 18 inches left of both strands, so no waste as those scrap ends will eventually get put to use.  I used black tether cord with scaffold knots at each end for a two foot long dummy retention cord to attach to a belt, bag, gear, etc..

For the Companion Compass, I was thinking of adding it to a zipper pull, or a tether cord necklace, but instead attached it to a Grimloc, to clip to MOLLE webbing, or use with an EDC keychain, etc...

I ran some 1.4mm cord through the compass's brass attachment point, through a pewter Schmuckatelli Co. Joe skull, around the Grimloc, then tied a two-strand wall knot, ran the cords back down through the skull bead and tied several more wall knots in a sinnet that looks a bit like a spinal column, then trimmed and melted the ends to finish.

Monday, October 12, 2015

Revisiting Globe Knots

It's been a long time since I tied any globe knots, and recently trying to get one done has led to a bit of frustration with getting the correct core size for the knot I was tying with paracord.

A lot of trial and error is involved sometimes when you're just eyeballing it and making a guesstimate, that leads to tying/untying and trying again until you're satisfied, not having gaps with too large a core, or bunched up and uneven with too small of one.  I ended up using a glass marble for this one.

Shown in my photo is a paracord wrist lanyard with a single pass of a globe knot, a two-strand stopper knot, and a couple of Two-strand wall knots to finish after running the cord through a small split ring with a clip.  The clip makes it easier for attaching/detaching the lanyard, which you might want if you use the screwdrivers on a pocket knife sometimes and a lanyard might get in the way, or want to switch the lanyard over to another knife, multitool, flashlight, keychain, or whatnot.

A knot tying friend reminded me that there's a 'globe knot calculator' out there (meant to be used with the Globe Knot Cookbook, that I don't have but have heard good reviews), and I'm sure I'd bookmarked it when it was mentioned on the old KHWW forums, but the site is gone and I've gone through a couple of hard disk crashes since then, losing a lot of good references with them that I know I should  have saved elsewhere than just on my computer.


I couple of other globe knots ya'll might like to try are an 18 facet and 45 facet knot, both originally shared on the French IGKT forums, but the original links I had for them in previous blog posts went dead, probably due to forum upgrades, but another knot tyer sent me the alternative links which thankfully still work.

The SAK(Swiss Army Knife) shown is a Victorinox Yeoman MS that I got from a friend, SwissBianco, at the Blade Show a few months ago, and the flashlight is a Sunwayman R10R that's been sitting in the gadget drawer since I bought it and hasn't seen the light of day in a while, lol.  The marlinspike in the second pic is a Knotter's Tool that I received from the JigProShop, handy for tightening/loosening knots and storing lacing needles inside as well.

Saturday, March 17, 2007

Snake knot lanyard

The main body of this lanyard is done in the snake knot. I started a little over 6 feet of paracord and made a 2 inch loop at the center of the length of cord, made a lanyard knot(also called a boatswain's whistle knot), then did a series of snake knots, fed the two cords thru a swivel clip and made another lanyard knot around the clip, trimmed and melted the ends. The finished length of this one is about 9 inches and I used about 6 feet of paracord in it.

This was a first attempt at this knot, which I believe is a variation of a two-strand wall knot(Ashley Book of Knots #775), so I wasn't sure how I'd use it. I think I'd make it a bit longer next time so that it would be long enough to also be used as a wrist lanyard as well as one to attach to keys, knives, flashlights, etc... and clip to a belt loop and hang down in a pocket.

Thanks to Scott for bringing the snake knot back to my attention. I'm sure I'd seen someone else use it before, but I don't remember where. I'm a member of quite a few forums and it's hard to keep track of them sometimes, but it helps in learning from the ideas shared on things to make with paracord in addition to the books I have.