This one started out about the same size as the previous sheath/pouch, but I decided to try tightening up the paracord weave by working it all up towards the starting end after I had it laid out.
This actually shortened up the length by a couple of inches, before folding to secure the sides.
The side edges were brought together with a length of 1.4mm cord to form the pouch section. This reduces the amount of available space inside compared with the previous method. It made a good fit for a Victorinox Spartan or a Tinker.
I think I'm gonna try a strip of velcro sewn to the flap edge and front edge of the sheath/pouch to secure it, when I can find some. And I also need to figure out an attachment for the back of the sheath/pouch... or maybe folded back and secured as a belt loop for an open ended type pouch. Of course with that type, whatever is in the pouch is gonna need a lanyard, at least for me it would.
This is another try for me, at a paracord sheath. I had tried one, two or three years ago, with a knotted section of paracord(like the paracord guitar strap I made), but wasn't satisfied with it, especially being too thick, and had put the idea on the long 'things to try later' list.
A recent thread on EDC Forums had me ready to give it another go and I used weaving this time. And if you don't mind the time and effort, this method can also be used for making variations of paracord bracelets, belts, shoulder straps, etc...
I used a long section of gutted paracord(about 12 ft used in finished sheath), to weave around four sections of paracord(inner strands intact), which were centered to have 8 strands to weave around.
A sample photo showing a short gutted piece of paracord woven around the other strands to give you the basic weaving method.
I started at the lined up centered ends, by sewing one end of the 12 ft working strand to itself, around the end of the cords. Then started weaving over, under, around, and back. Continuing until I had the length I wanted(about one foot long) and finished this part like I started by sewing the end to itself around an end cord strand.
I worked each the 8 loose strands back into weave on what will be the inside of the sheath, and trimmed/melted the ends in place. I could have sewed them down, but I just went for the quick fix. I also worked a length of shock cord into the weave for a loop which would go around the lanyard knot/button knot, that I added last, used to secure the sheath flap. Other options could be done with sewing velcro sections on, maybe a button or snaps, or maybe even magnets.
I folded the completed woven section over, to form the parts for the body and the flap of the sheath, using my Victorinox Spirit as a size guide. Then I took another 5 ft section of gutted paracord and worked it around the woven edges to make the sides. Going from the top of the body, down to the bottom, across, and back up the other side. The start and ends of the cord were tucked and worked into the inner woven sections. I did have some nylon webbing that could have been sewn in place for the sides instead of more paracord, and elastic would probably be even better to allow various sized items to fit in the sheath for a snug fit, but I decided to stick with using mostly paracord for this one.
I've not added a belt clip, belt loop, or other attachment method yet and that's just something else to experiment with later...
For adding a belt loop to the paracord sheath, I integrated a simple cobra stitch/Solomon bar/Portuguese sinnet, with a gutted strand of paracord.
I used about a 4 foot length of paracord and with my hemostats, I pulled both ends through the sheath, at where I wanted the bottom of the loop, up the inside to where the top would be, both strands out the back and ends pulled through the center of the belt loop piece at the bottom, knotted back up to the top, and trimmed/melted the ends to finish.
Two shorter versions could be done parallel on the sheath for it to be worn horizontally instead...
I think I'd still like the option of adding a metal belt clip probably attached with a couple of short Chicago screws. I've been digging through drawers and boxes looking for an old sheath that I could scavenge a potential clip from to use, but haven't found anything suitable yet...
I'll have to see how the sheath wears over time, but maybe some needle and thread(maybe kevlar or spectra instead of the common polyster type) worked around the high stress areas, like around the belt loop ends and around the button knot, might keep them from being pulled out of place over time and moving against the woven sections around them.
I gave the titanium pieces a once over with a butane torch to give them a bit of color beyond the common gray finish titanium usually has.
I figured I'd try making a leather sheath for one of the widgy bars, to keep it from being noisy on a loaded edc keyring and also help prevent the tool from stabbing my leg when kept in a front pocket.
I've had a bag of scrap leather pieces that I'd bought back around 2008, at the time planning to use some for a sling pouch with paracord, but other than using some of the leather strips for some short and simple Turk's head knots or monkey's fists, the bag has been tucked away in a storage bin in the closet. I dug some out and cut a section to use as an open ended pouch for one of the widgy bars, doing some leather edge lacing, The Double Loop stitching as seen in a YouTube tutorial video.
I don't have much in the way of leather working tools, so I just used scissors to cut out an estimated size to fit the pry bar plus stitching/lacing, a tape measure to mark out spacing for holes, Dremel tool with drill bit to make the holes, and a lacing needle to work the leather lacing.
The pry bar is a snug fit and seems to hold well enough to not fall out on its own, and the curved widgy bar also fit the same sheath too. I wasn't sure it would at first, but it fits and holds nicely.
I used my wood burning tool to melt the ends in place, but folks should experiment with different methods to see which they prefer for any given project, and it's good to know more than one way to finish. As an example, using natrual fiber cord, like cotton, hemp, or jute twine, means you can't melt/singe the ends in place like you can with synthetic nylon or poly cords, so sewing, gluing, tucking, or whipping the ends in place would be done instead.
Note that the wrap is the same on both prybars, but that anytime you use cord that has a different color tracer thread in it, combination colors, or camo, that it can make it difficult to see the pattern of the knot work, so I personally prefer solid colors most of the time for decorative work, but the other variations can certainly be useful too.
A couple of edc setups with paracord wrist lanyards and Copper Cord Clutch beads are shown with the widgy bars, Victorinox Cadet Swiss Army Knives in red and a rare copper one from my collection, and Olight S10 LED flashlight on one, and Maratac Copper CR123 on the other.
I used orange 0.9mm string to tie a 3 pass Gaucho knot around the blue anodized screwdriver, finished with a light coat of krazy glue, and the knot works great for added grip when using the tool.
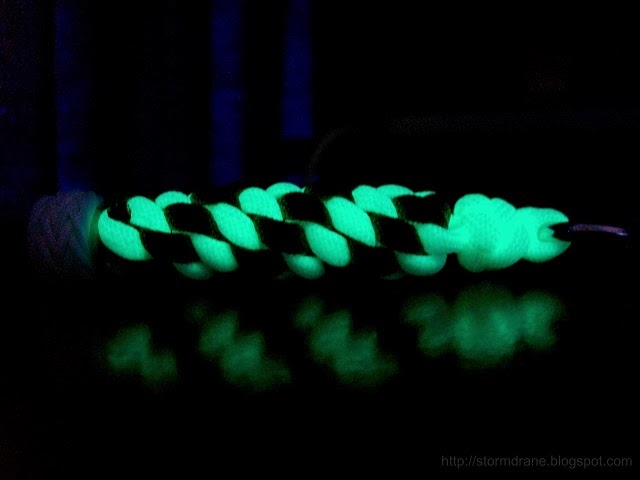
Glow-in-the-dark paracord has been available for a few years now, but I hadn't bought any to try out until recently. I purchased a 50 foot hank of the white glow paracord, that's also available in light shades of blue, pink, green, and yellow.
I tied a round crown sinnet neck/ID/badge type lanyard using about three feet of the glow paracord and six feet of camo or ranger green(so many colors now it's hard to keep track when working with unlabeled remnants), leaving inner strands intact, adding a swivel snap hook, safety break-away clasp, a three pass Gaucho knot sliding bead done with 1.4mm cord, another Gaucho on the snap hook with 0.9mm cord, and a couple of tiny Spanish ring knots over the sewn sections on each side of the safety clasp, using a bit of strategic super/krazy glue application on the Gauchos and ring knots.
Most of the glow paracord sellers appear to be using the same stock photos, so they all probably source the cord from the same manufacturer overseas. The only U.S. made paracord that offers any 'glow', is the stuff with a glow tracer thread run in with the outer sheath, and the few examples I've bought of those have been very weak in the glow department.
I compared the glow paracord with the CoolGlowStuff glow rope that I've used in the past, and the glow was similar in initial brightness, quickly dimming, but still visible with dark adjusted eyes several hours later. So for a key fob or lanyard attached to some EDC gadget/gear you might want to easily find on a nightstand in the middle of the night, it performs adequately.
The cord I bought has 9 twister nylon core strands, and I've seen some of the sellers mention the outer sheath is polyester. I do not know if it shrinks up or not, but that's something you may want to check if you make size oriented items like paracord bracelets or pet collars with it.
The hank I received looks to be a bit lumpy in some sections, even visible in some sellers stock pics, which is okay if you're going to gut the cord, but annoying if you leave it intact. From experience, I've seen that with several different manufacturers of commercial paracord, made in the U.S.A., so it is not isolated to any one maker/distributor. Distributors with good customer service should take it back without a problem. I'd think they'd try to avoid sending cord out like that, but it still happens...
And a paracord key fob/zipper pull square crown sinnet with wall knot, tied with glow paracord and maroon paracord, shown attached with split ring to a Maxpedition Cocoon pouch.
The CoolGlowStuff website has been down a while now, so the source for their decent glow cord/rope is probably no longer producing it.
I used the red/black Pico Pull on a short loop of gutted red paracord(tucked/sewn together) to replace the adjustable buckle pull tab on the VENOM bag, adding a few gaucho knots, tied with black and red 0.9mm cord. I put the cool Grab & Go First Aid Kit in the zippered pouch of the bag.
I tied a couple of zipper pull/keyfobs with the stainless Pico Pulls. First a small gutted loop of paracord was run through the pull lanyard hole, tucked into itself and securely sewn together with needle and thread. That left a small loop at the other end for a small split ring, then more knot work was done over the paracord, like the example shown with a long 4 bight Turk's head knot, which was done with gutted navy blue paracord, and orange 0.9mm cord added in with the pineapple knot interweave.
And did some West Country Whipping with gutted 425 licorice paracord(red/black) with ends trimmed/melted, over a fixed loop(sewn together) of gutted 550 paracord(4 inch leftover scrap), attached to the other stainless steel pico pull. This one has a half dozen Benadryl inside.
The Para-tape is the paracord outer sheath, flattened and without any inner strands, and is still fairly strong cord on its own(250lb test). It's good for utility uses or for knotting projects where you might have planned to gut the cord anyway and toss the remains.
If I don't end up using those hanks for a possible paracord weaving project that would require a very long length of gutted cord(on the planned to-do list), I may keep one compact hank in the truck glove box and the other in a bug-out-bag. Although I have other paracord with the inner strands intact for just-in-case, I like having the extra cord around and that it takes up less storage space.
I stopped by one of the local Army/Navy stores, that I hadn't been to in a while, and they've got lots of paracord choices than what they had before. At my last visit, over a year ago, I bought a couple of 100 ft hanks of paracord from their small selection of standard colors: black, tan, olive drab, white.
Now they offer many different colors in neons/camos/solids and have multiple brands to choose from: Atlanco, Atwood Rope Mfg, Rothco, all commercial type 550 paracord with 7 inner strands, and had a couple of larger 1000+ ft. sized spools. They had paracord bracelet kits, with about 10 ft of paracord and a 3/8" side release buckle with included instructions, various colors of 3/8" buckles in multi-packs, and some 5/8" black buckles, and handmade paracord duck call neck lanyards as well.
The DIY paracord using crowd has certainly gained in popularity over the last several years. It may be worth a trip to check your local Army/Navy store to see what they have in stock, if they're not too far away. The cost of gasoline is getting close to being higher than the shipping and handling charges when ordering online...
A few future knotting projects I have on the mental 'to do' list:
Add some paracord to a kydex sheath of the Horan Knives Sub-Q Tanto knife. Tim did a nice Japanese style wrap over nylon cord on the handle.
A blog reader, Ronnie H., sent me a large stone arrowhead that he made himself. An amazing piece of skilled craftsmanship(knapping) with very sharp edges. I was thinking of trying to mount it to a short section of 'arrow shaft' for display, in a small frame. I need to find a suitable sized piece of wood to use and maybe trying traditional arrow making tying methods, with artificial sinew or leather, or even playing around with using a turks head knot with small diameter nylon for attachment with some type of hitching over the shaft.
I've had an unused pool cue for several years, and have tried a few different knotted grips/hitchings for the handle, but haven't been satisfied with anything yet. I've left some green flat nylon cord wrapped around it, that I've tried a couple of open turks head knot patterns over, but have removed those and put it on a back burner until I get in a good knotting mood to get it just right...
I found a neat 'First Aid Aluminun Bottle' at Big Lots, which has a screw on compartment/mug with a small first aid kit included. It will eventually get some type of paracord knotted or hitched pouch/wrap to carry it. The only online source I could find for this bottle was on Amazon.
*Note: A white cross on a red field is recognized as the Flag of Switzerland, and a red cross on a white field is recognized as the symbol of the Red Cross. The International Organization of Standardization (ISO) sets a standard for the first aid symbol of being marked with a white cross on a green background, so that anyone requiring first aid would recognize the sign.
 This one started out about the same size as the previous sheath/pouch, but I decided to try tightening up the paracord weave by working it all up towards the starting end after I had it laid out.

 I think I'm gonna try a strip of velcro sewn to the flap edge and front edge of the sheath/pouch to secure it, when I can find some. And I also need to figure out an attachment for the back of the sheath/pouch... or maybe folded back and secured as a belt loop for an open ended type pouch. Of course with that type, whatever is in the pouch is gonna need a lanyard, at least for me it would.